NGINX (pronounced "engine-x") is a popular open-source web server, reverse proxy server, and load balancer. It is known for its high performance, scalability, and efficiency, making it a popular choice for serving web content and optimizing resource utilization. In this tutorial, we will create an NGINX web server serving a static webpage and integrate IPinfo’s IP databases for IP-based intelligence capabilities.
IPinfo’s IP database can provide an extended set of features and controls with NGINX, for example:
- Load Balancing: NGINX can use IPinfo’s geolocation data to implement enhanced load balancing. By distributing traffic based on users' geographic location identified through IP geolocation, you can optimize server resources and improve the overall performance of your website. You can use the IPinfo IP to Country database (free) or the IP to Geolocation database.
- Security: IPinfo’s IP database can be used to enhance the security measures of an NGINX web server. For example, you can implement webserver access controls based on users' geographic location using the IPinfo IP to Geolocation or IPinfo IP to Country database. IPinfo also has data sets to enable controls like filtering anonymous IP address access using the IP to Privacy detection database, AS organization or IP company-based restrictions.
- Compliance with Regulations and Digital Rights Management: Some industries and regions have specific data protection and privacy regulations. Using geolocation data can help you ensure compliance with these regulations by controlling the access and storage of user information based on their location. Integrating this data also permits the detection of the use of anonymous IP services (such as VPN). This can be useful for implementing region-specific content restrictions, complying with licensing agreements, or blocking traffic from high-risk regions.
- Customized User Experience and Content Localization: By knowing the geographical location of users, you can customize the user experience further. This may include displaying location-specific information, tailored advertisements, or adjusting the site layout to match cultural preferences.
What is a web server?
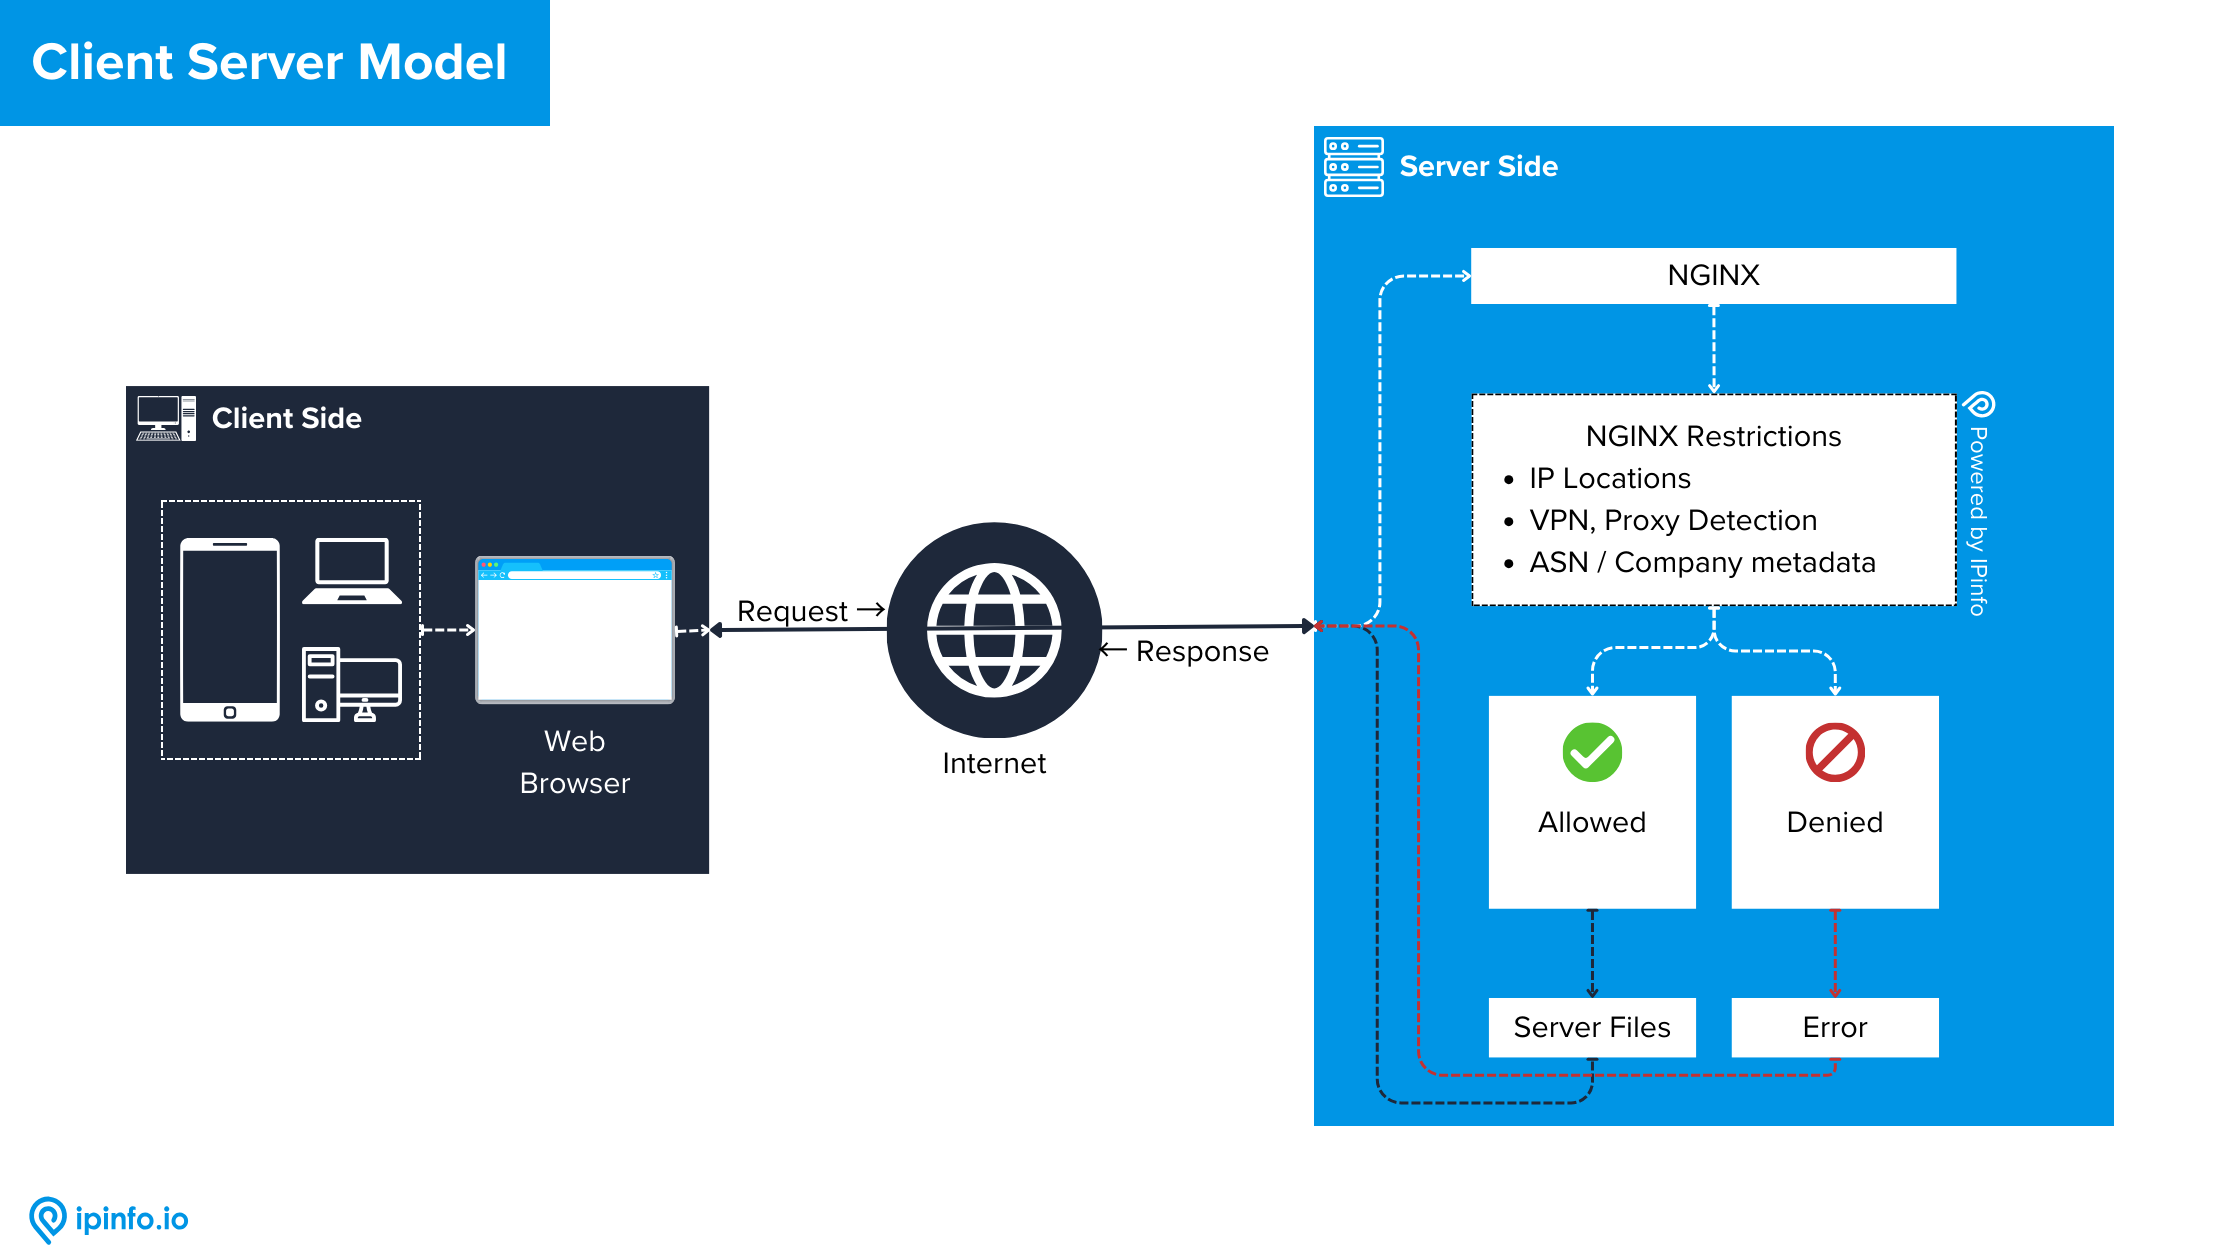
A web server is a software application that handles communication between clients, such as web browsers and a website. Its primary function is to deliver web pages and other content to users when requested. When a user enters a web address (URL) into a browser, the browser sends a request to the web server hosting the corresponding website. The web server then processes the request, retrieves the requested resources (such as HTML files, images, stylesheets, etc.), and sends them back to the user's browser for display. This entire process is known as the client-server model, where the web browser acts as the client and the web server as the server. Web servers can handle various types of content, including static content (unchanging files like HTML and images) and dynamic content (generated on the fly based on user input or other variables, often using server-side scripting languages like PHP, Python, or Node.js).
NGINX is a popular open-source web and reverse proxy server. It is designed to efficiently handle many concurrent connections and deliver web content quickly and reliably. IP data from IPinfo, including information such as IP to location, ASN data, IP to privacy detection, WHOIS data, etc., can be leveraged in NGINX for security, access control, content customization, and performance optimization.
Starting from Scratch: Serving a static webpage with NGINX
Rather than go into full-stack development with NGINX, we should dip our toes into NGINX with basic static content serving. We are going to start from scratch and serve a static webpage.
Step 1: Get a VPS (Virtual Private Server)
Virtual private servers are available for little or no cost. Oracle Cloud services offer a free plan with a free VPS, and plenty of hosting providers (such as Digital Ocean, Linode, Vultr, etc.) offer cheap VPS options. For this example, a low-cost or free option will suffice. Although local development of NGINX is possible, we recommend starting with a VPS because it is more representative of real-world usage scenarios.
For this tutorial, we recommend using Ubuntu for the system OS and an IPv4-enabled VPS.
Step 2: Access your VPS
After you have acquired the VPS, you will be presented with:
- IP Address: The server's IP address where the VPS is hosted.
- Username: The username of the VPS. It is usually root.
- Password: Password to access your VPS.
Be sure to note this information for use during this tutorial.

Now you can SSH into the server using the following command from your local terminal with a command such as:
ssh root@194.116.190.149
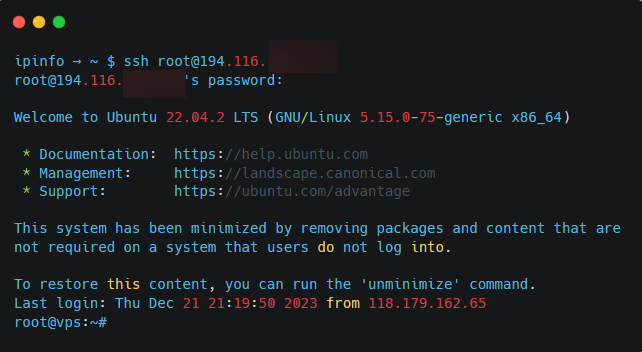
All our programming and code development will now be done through this connection to the VPS. You should run the commands from your VPS, not locally, on your own system.
You should also do these optional but recommended steps.
- After sshing into the server, run
curl ipinfo.ioon the terminal to call the IPinfo API and verify the geolocation information of the VPS. This not only confirms access to the internet but also checks if the server location is accurate - Run package updates and upgrades for your VPS using
sudo apt updatefollowed bysudo apt upgrade - Important: the example commands in this guide are specific to Ubuntu/Debian Linux, they will vary if you choose a different Linux distribution. Consult your VPS’ help section if you are unable to use Ubuntu for this guide
Step 3: Install NGINX on the VPS and do the basic configuration
To keep things simple for now, we will just set up the static file hosting server with NGINX. We will add more stuff down the line when we configure our IP database. Assuming you are still sshed into the server, in your VPS terminal, run the following command:
sudo apt install nginx
After installing NGINX, confirm that it is running by running the following command:
systemctl status nginx
If you see that the NGINX web server is running, then you are good to go.

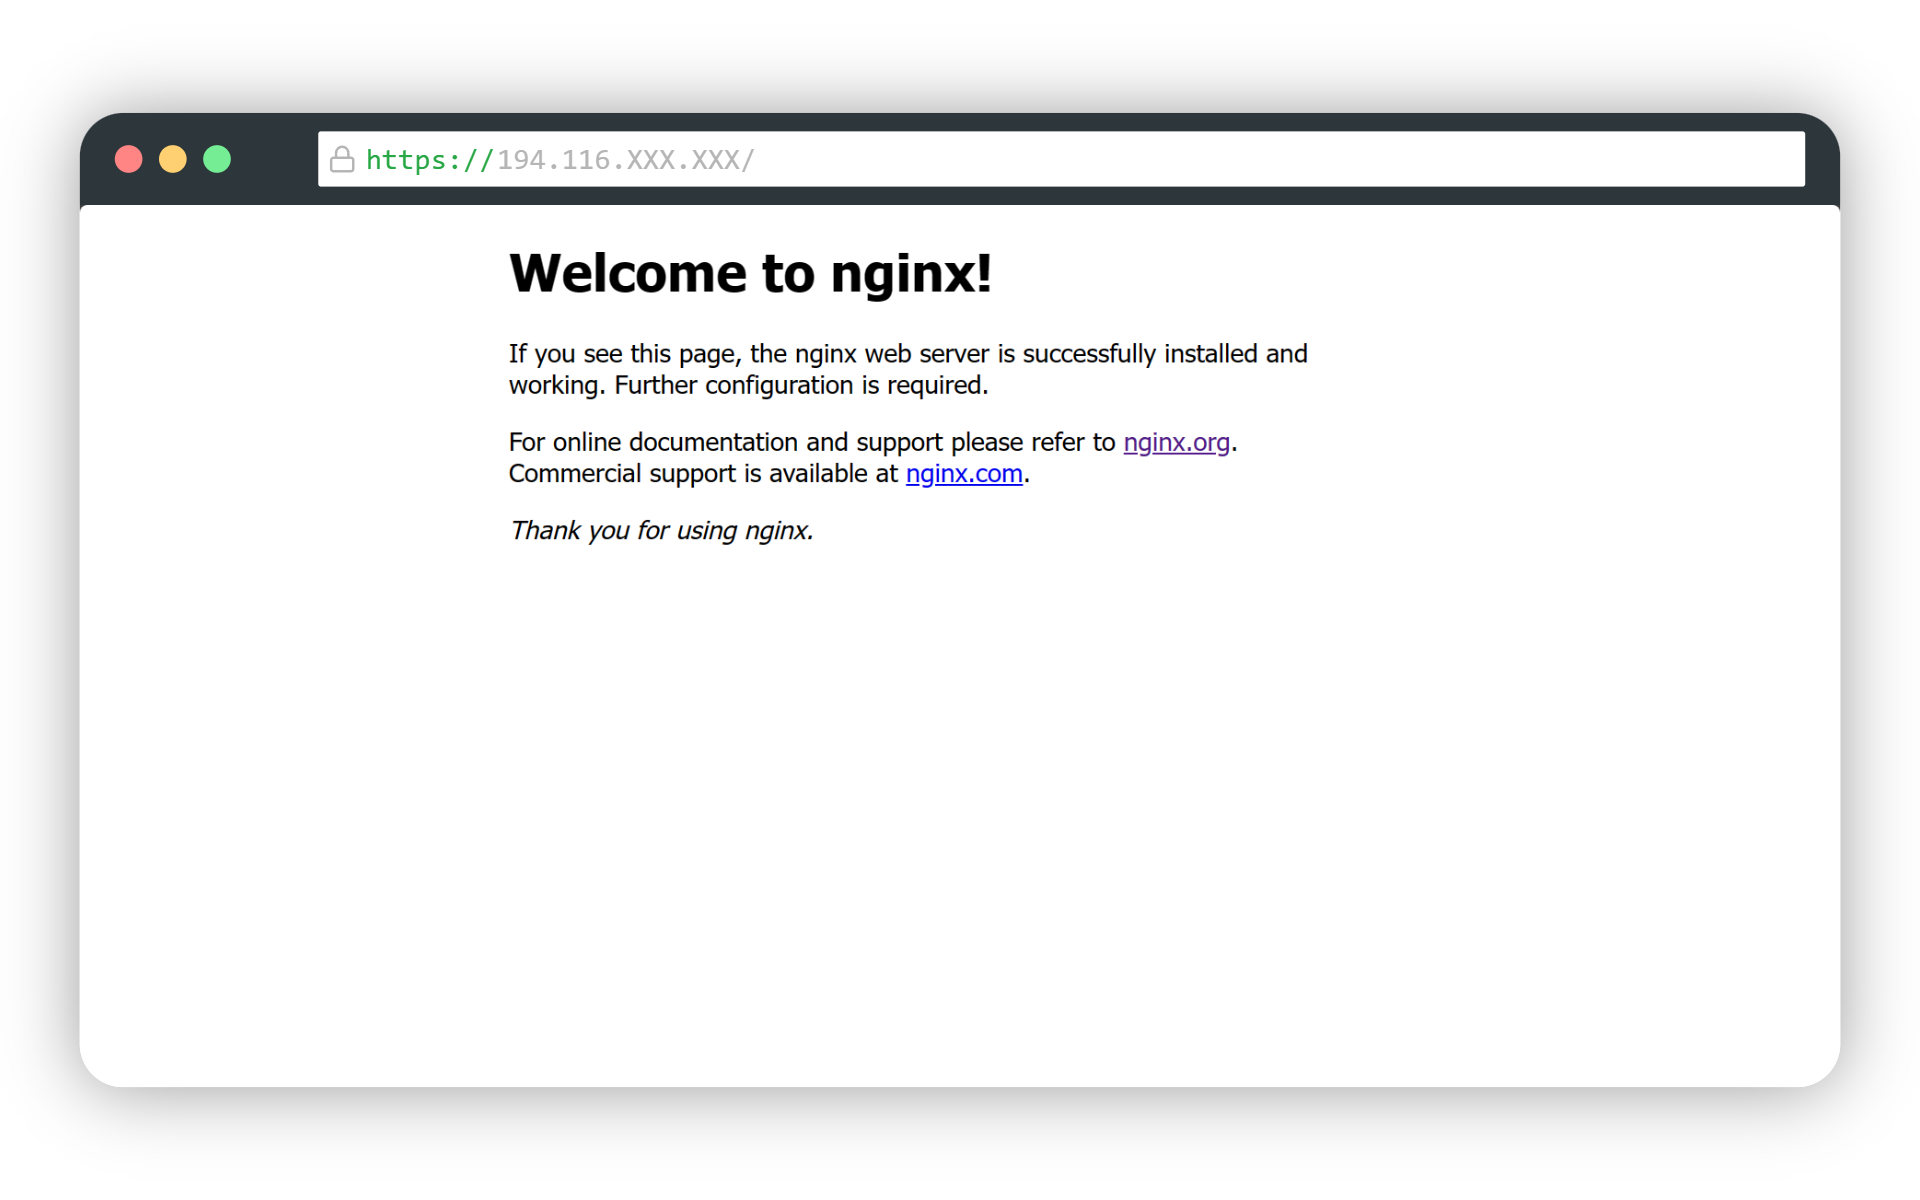
If you visit the IP address of your server from your web browser, you will also be greeted with the following landing page. If NGINX is running but not accessible from your local web browser, you may have to set up firewall rules within your VPS provider, check their documentation for details.
Now that you have NGINX installed, you must create an NGINX website config file.
The website config file will be called “ipinfotest" and it will be located in “/etc/nginx/sites-available/ipinfotest". In the terminal, create the config file and edit it with a text editor:
touch /etc/nginx/sites-available/ipinfotest
nano /etc/nginx/sites-available/ipinfotest
Add the following code to the/etc/nginx/sites-available/ipinfotest configuration file:
server {
  listen 80;
	listen [::]:80;

	# If you have set up a domain, you can add them here
	# server_name  example.com www.example.com;
	# As we are not using a domain, add the IP address of your server
	server_name 194.116.190.XXX;

  location / {
  	# Path to static webpage
		root /var/www/ipinfotest;

		# index.html here is HTML file the visitor lands on visiting the domain/ip address
		index index.html index.htm index.nginx-debian.html;

		# 404 handling
		try_files $uri $uri/ =404;
	  }
}
Add the server’s IP address in the server_name line in this section. Replace 194.116.190.XXX with the IP address of your server.
Here is a breakdown of the configuration file options:
location / { ... }: Defines how NGINX should process requests for the specified location ("/" in this case). This is the home page equivalent.root /var/www/ipinfotest;: Defines the root directory where NGINX should look for files to serve. In this case, it's set to/var/www/ipinfotest.index index.html index.htm index.nginx-debian.html;: Specifies the order in which NGINX should look for index files when a directory is requested. Currently, there is noindex.html, and we will set it up in the next step.server_name194.116.XXX.XXX;: Defines the server's name. This configuration is suitable for serving a basic static website. If you have a domain, you can replace theserver_name 194.116.XXX.XXX;line with your actual domain name. The domains should account for the presence and absence ofwwwas inserver_name example.com www.example.com;. But for this tutorial, we will not set up a domain and will share the web page directly from the server IP address.
Step 4: Create the root file serving directory and the static page
For the file to be served by NGINX, create a directory at /var/www/ipinfotest; and then change your present working directory to it.
mkdir /var/www/ipinfotest
cd /var/www/ipinfotest
Every file we add here will be served using NGINX. Therefore, adding our index.html file here will make it available to users when they visit the server's IP address in their browser.
So, we will add our index.html file there. You can use whatever file editor you want to add content to the index.html file.
touch ./index.html
nano ./index.html
In the index.html file, put the following content.
<!DOCTYPE html>
<head>
<title>IPinfo NGINX Test Webpage</title>
</head>
<body>
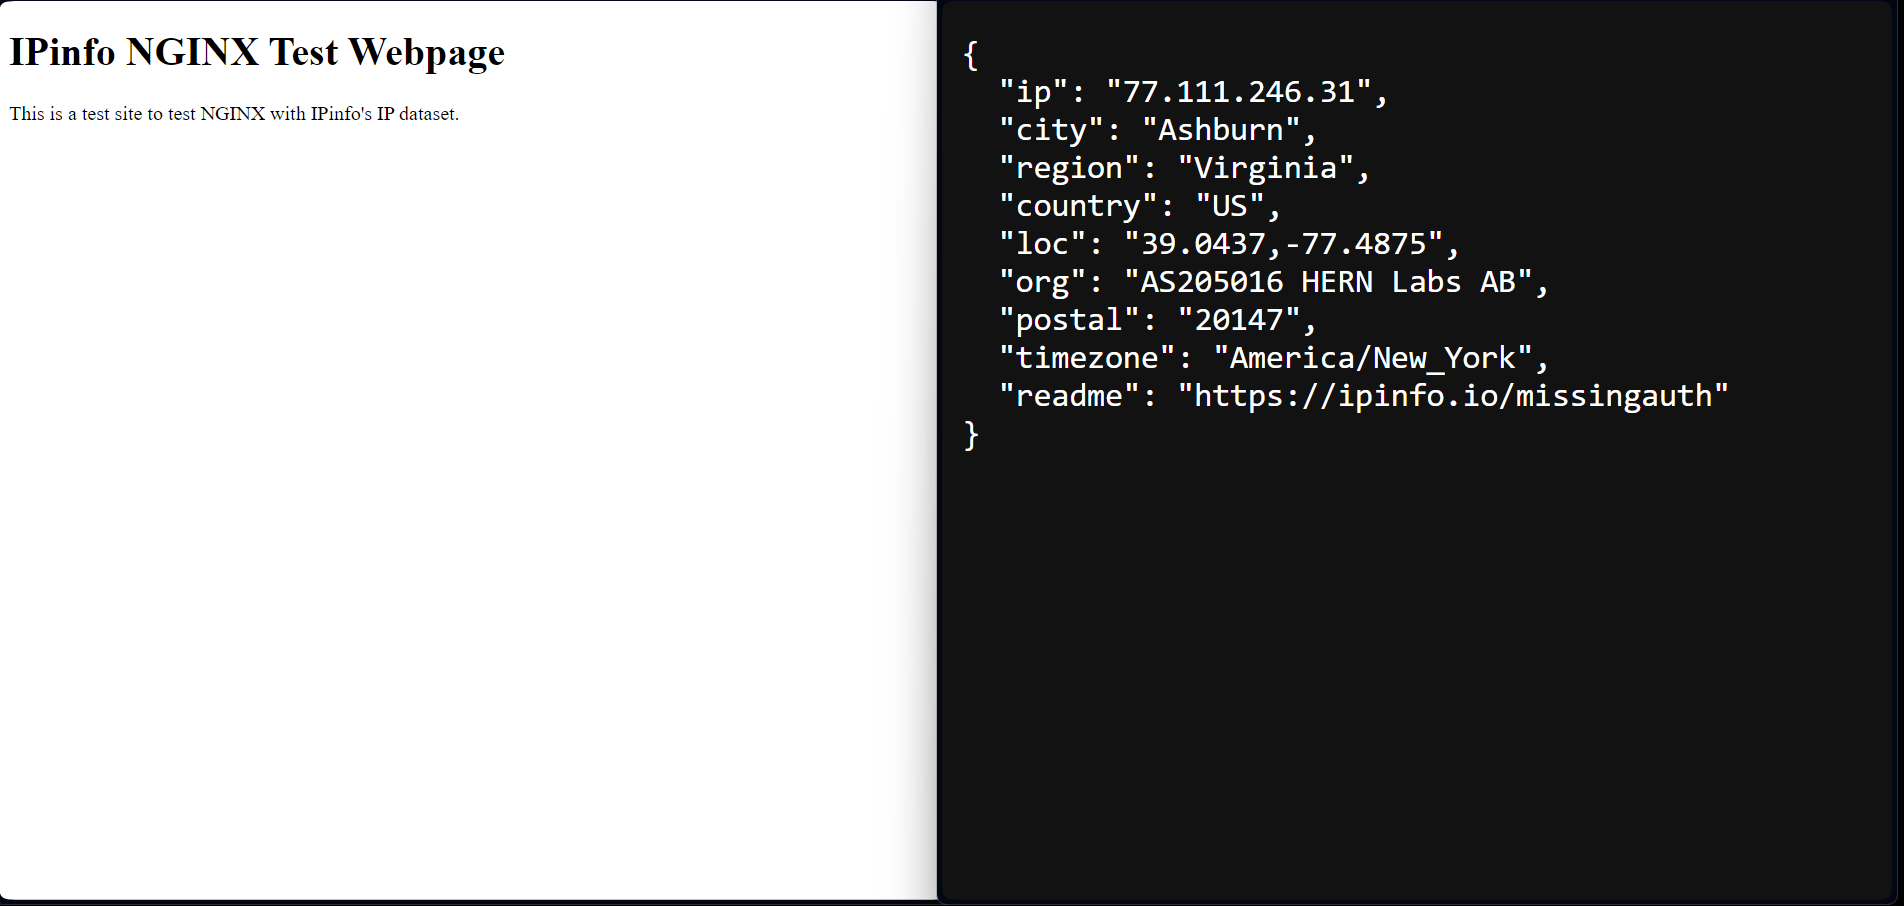
<h1>IPinfo NGINX Test Webpage</h1>
<p>This is a test site to test NGINX with IPinfo's IP dataset.</p>
</body>
</html>
Now, after you have created the index.html file, save and exit.
Step 5: Create the symbolic link
Now that you have configured NGINX (Step 3), set up the webpages to serve (Step 4). You will create a symbolic link between the file directory (ipinfotest) and the sites-enabledthe files to serve, and directory. Run the following command on the terminal:
sudo ln -s /etc/nginx/sites-available/ipinfotest /etc/nginx/sites-enabled/
Step 5: Hosting the file using NGINX and checking out the website
Now that you have created the configuration files, the files to serve, and the symbolic link, it is finally time to deploy the webpage.
First, test the NGINX configuration to ensure everything is set properly.
sudo nginx -t
If everything is running, you will get the following output:
nginx: the configuration file /etc/nginx/nginx.conf syntax is ok
nginx: configuration file /etc/nginx/nginx.conf test is successful
Then, once everything is set, restart the NGINX service with the following command:
sudo service nginx restart
After you have restarted NGINX, you can visit the IP address of your server from your web browser, and you will be presented with the HTML page we created.
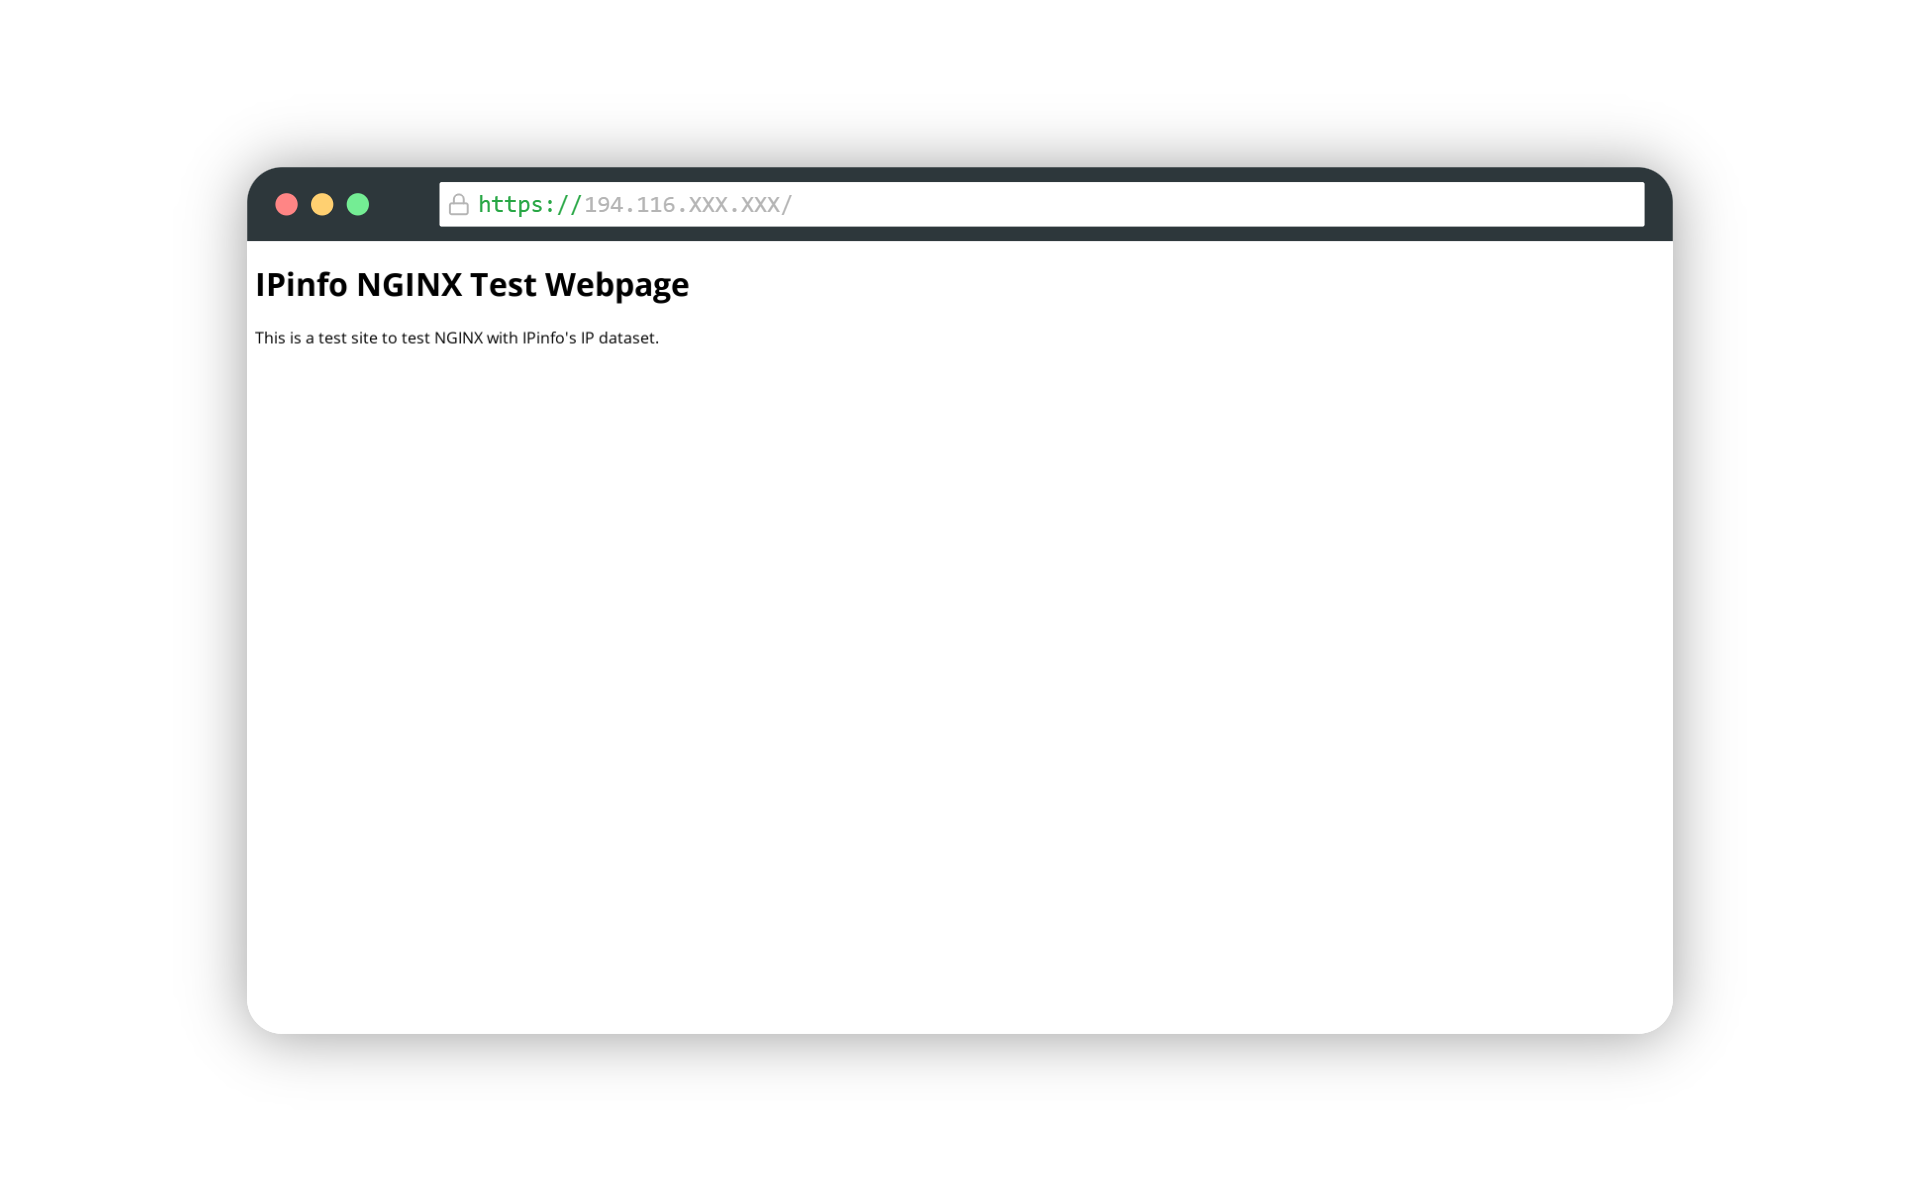
Now, you have a real-life website served using NGINX! Now, let’s integrate IPinfo’s IP database elements with this site and extend its capabilities.
GeoIP2 Module with standard NGINX
The GeoIP2 module will handle the IP database wrangling, generating separate IP access parameters and using multiple IP metadata-based conditions in your NGINX configuration file. This module will work with all IPinfo’s IP databases.
Some notes
Before we start, one thing to note is the difference between NGINX and NGINX plus service. NGINX is a technology that is freely available to use, however, NGINX Plus is a commercial service from F5. Although NGINX Plus comes with easier integration with the NGINX module it does not offer any free tier and only provides trial access. For this section, we will focus on NGINX as a free self-hosted web server solution.
Several NGINX distributions package the GeoIP MMDB reader module natively; however, they are outside of the scope of this tutorial.
Step 1: Documentation
The documentation for the GeoIP2 MMDB Reader Module is available here: https://github.com/leev/ngx_http_geoip2_module
 leev
leevIn the documentation, the author uses an older database to demonstrate the module's usage. However, this module can be used seamlessly with IPinfo's IP databases.
This module will utilize the MMDB file format of IPinfo's IP databases. You can check out our article “How to choose the best file format for your IPinfo database?” to learn more about the MMDB file format. As this is a specific binary file format, it requires special software. So, we need to install the required software in our VPS.
 IPinfo Team
Step 2: Install MMDB reader utility software
As the MMDB is a binary dataset, you need a handful of applications to bridge the connection between the NGINX web servers and the data in the MMDB dataset. So, install all these utility packages first:
sudo apt install -y libmaxminddb0 libmaxminddb-dev mmdb-bin build-essential libpcre3-dev zlib1g-dev libssl-dev libxml2-dev libxslt-dev libgd-dev
Step 3: Redownload the NGINX software
You need to download the NGINX software again; however, we will not install it. This is necessary because you need to compile the GeoIP2 MMDB reader module for the web server. We are going to download the NGINX software from the NGINX.org website.
Before you download the NGINX software again, check the version of your existing and installed NGINX software. Run the following command to do so:
nginx -v
For us, this results in the following output:
nginx version: nginx/1.18.0 (Ubuntu)
Our current version of NGINX is 1.18. So, we need to download the same version of NGINX again. After downloading the NGINX software directory package and extracting the files from the compressed directory, change the working directory to that directory:
wget <https://nginx.org/download/nginx-1.18.0.tar.gz>
tar xvfz nginx-1.18.0.tar.gz
cd nginx-1.18.0
Step 4: Install the ngx_http_geoip2_module
You need to install the module from its source code. The source code is available here: https://github.com/leev/ngx_http_geoip2_module
Install the ngx_http_geoip2_module in the nginx-1.18.0 directory and unzip it with tar.
wget <https://github.com/leev/ngx_http_geoip2_module/archive/refs/tags/3.4.tar.gz>
tar xvfz 3.4.tar.gz
Step 5: Compiling the module

Here, we will compile the module from the source code using the NGINX software we downloaded. Inside /nginx-1.18.0 run the following command:
./configure --add-dynamic-module=./ngx_http_geoip2_module-3.4 $(nginx -V) --with-compat
Code breakdown:
./configure: This is the script used to configure the build settings for NGINX.-add-dynamic-module=./ngx_http_geoip2_module-3.4: This option specifies that you want to add a dynamic module during the NGINX build process. The path provided (./ngx_http_geoip2_module-3.4) points to the directory of the dynamic module.$(nginx -V): This part is a command substitution. It runs the commandnginx -Vto obtain the current NGINX configuration options (such as paths, modules, and compile flags) and includes them in the./configurecommand. Thenginx -Vcommand shows the NGINX version and compile-time configuration.-with-compat: This option is used when building dynamic modules to ensure compatibility with different NGINX versions.
This will create the configuration files for the NGINX install file. Then run the following command to make the binaries:
make
After running make, the GeoIP2 MMDB reader libraries will be stored in the objs directory.
ls objs/
Step 6: Copying the NGINX module and adding to the config file
Run the following command to bring the newly-built unavailable to your installed NGINX directory:
cp objs/ngx_http_geoip2_module.so /usr/share/nginx/modules/
Please note that in some installations, the stream functionality is unavailable, and only http functionality is. As in this case, we do not have stream, we are not going to generate or copy ngx_stream_geoip2_module.so module.
From now on, you can use the ngx_http_geoip2_module.so module in your NGINX configuration.
Run the NGINX test command to verify everything is working as expected
However, in some instances, you might have to declare the module load command manually. In that case, open up the main NGINX configuration file (/etc/nginx/nginx.conf) in your text editor:
nano /etc/nginx/nginx.conf
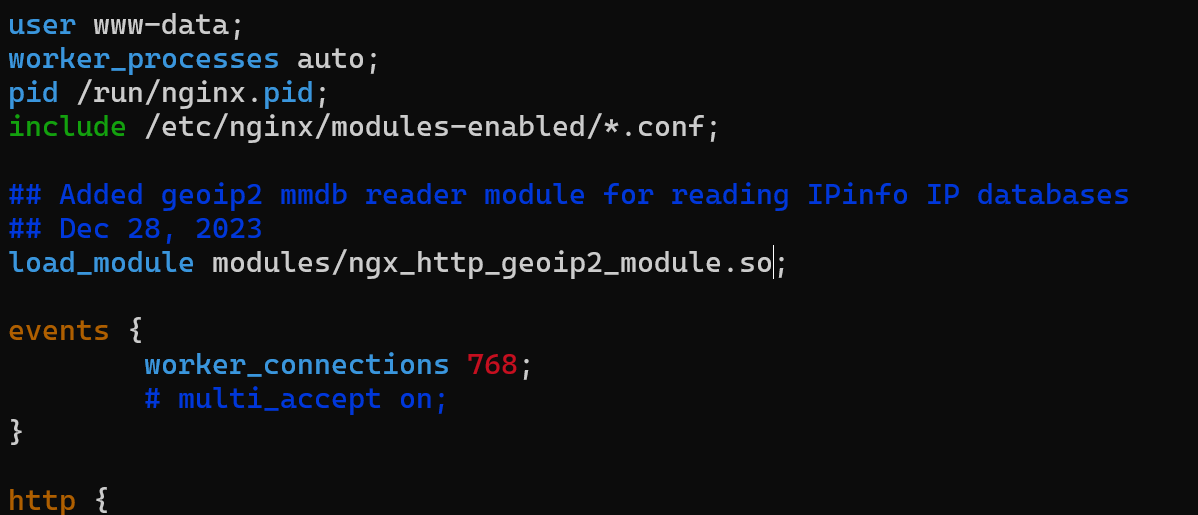
Then you will need to add load_module modules/ngx_http_geoip2_module.so; line at the top of the file there:
user www-data;
worker_processes auto;
pid /run/nginx.pid;
include /etc/nginx/modules-enabled/*.conf;

######### ADD THESE LINES #########
## Added geoip2 mmdb reader module for reading IPinfo IP databases
## Dec 28, 2023
load_module modules/ngx_http_geoip2_module.so;

events {
# [...]
Then, you can run the NGINX test command: nginx -t. If you see the following error stating the module was already loaded, remove load_module from /etc/nginx/nginx.conf and try again.

Setting up IPinfo IP databases with NGINX and GeoIP2 module
We will start setting up the IPinfo IP databases and developing IP-based control mechanisms and functions using the GeoIP2 NGINX module.
Step 1: Downloading the IPinfo IP databases
We will work with the IP to Country database for this tutorial as this is a free, full-access database that is updated daily. We will download the MMDB format database into the /etc/nginx/ipinfo directory.
First, you will need to create the download directory and change your working directory to the following:
mkdir /etc/nginx/ipinfo
cd /etc/nginx/ipinfo
Here, we will use the IPinfo IP to Country download URI to download the database. Make sure to change the place $token value with your IPinfo access token. You can copy your IPinfo access token from this link. The downloaded database will be saved as country.mmdb.
curl -L "<https://ipinfo.io/data/free/country.mmdb?token=$token>" -o country.mmdb

Step 2: Setting up the GeoIP2 module with IPinfo’s database
Now, edit the main NGINX configuration file (/etc/nginx/nginx.conf) to connect the IPinfo database through the GeoIP2 module. In the http section of /etc/nginx/nginx.conf, you will need to declare the database variables concerning the database schema:
# [...]
http {
	# [...]
		## IPinfo database schema declaration for the GeoIP2 MMDB reader library
		geoip2 /etc/nginx/ipinfo/country.mmdb {
			$ipinfo_continent continent;
			$ipinfo_continent_name continent_name;
			$ipinfo_country country;
			$ipinfo_country_name country_name;
	}
	# [...]
}
# [...]
The NGINX geoip2 MMDB reader library is data structure-agnostic. So, you can use all our IP databases here. You must create a generic variable name and pass the IP metadata columns according to the respective IPinfo IP database structure/schema. You can find the database schema of all our IP databases here: https://ipinfo.io/developers/database-types
- File located in:
/etc/nginx/ipinfo/standard_location.mmdb - Downloaded file name:
standard_location.mmdb - Database schema: https://ipinfo.io/developers/ip-to-geolocation-database
geoip2 /etc/nginx/ipinfo/standard_location.mmdb {
	$ipinfo_iploc_city city;
	$ipinfo_iploc_region region;
	$ipinfo_iploc_country country;
	$ipinfo_iploc_latitude latitude;
	$ipinfo_iploc_longitude longitude;
	$ipinfo_iploc_postal_code postal_code;
	$ipinfo_iploc_timezone timezone;
}
IP to Privacy Detection database
- File located in:
/etc/nginx/ipinfo/privacy.mmdb - Downloaded file name:
privacy.mmdb - Database schema: https://ipinfo.io/developers/privacy-detection-database
geoip2 /etc/nginx/ipinfo/privacy.mmdb {
	$ipinfo_privacy_hosting hosting;
	$ipinfo_privacy_proxy proxy;
	$ipinfo_privacy_tor tor;
	$ipinfo_privacy_vpn vpn;
	$ipinfo_privacy_relay relay;
	$ipinfo_privacy_service service;
}
We are now essentially set up with the IPinfo IP to Country database with NGINX.
Step 3 (OPTIONAL): Set up a cronjob to refresh the IPinfo IP database
As our IP to Country database is updated daily, you should download the database daily for accurate IP data for your NGINX web server. You can do that by setting up a cronjob.
- Open the crontab configuration:
crontab -e
- Add the following line to run the command daily at a specific time (replace
$tokenwith your actual token):
0 0 * * * curl -L "<https://ipinfo.io/data/free/country.mmdb?token=$token>" -o /etc/nginx/ipinfo/country.mmdb
0 0 * * * specifies the timing for the cron job. In this case, the job will run at midnight every day. Save the file, and you are configured for IP data, fresh every day.
IP country-based access control
In this section, we will set up access control based on the geolocation of the website visitor. The geolocation data is going to focus on the country-level data.
Allow access based on geolocation
For this case, we will allow visitors from all other countries except for Singapore to access the website we made. This operation will be powered by our IP to Country database that we connected to NGINX. You can also use our IP to Geolocation database here.
Add the following code in the HTTP section of /etc/nginx/nginx.conf:
map $ipinfo_country $allowed_country {
	default yes;
	SG no;
}
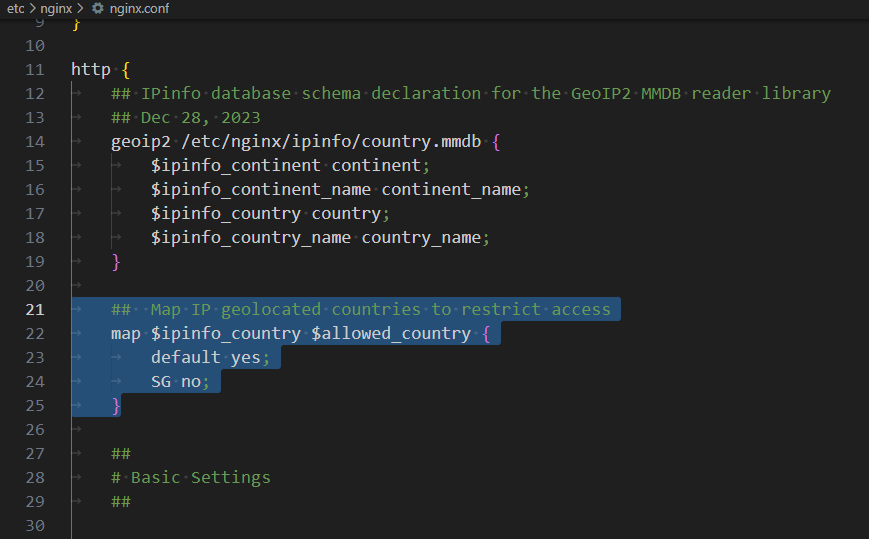
Code breakdown:
- map: The map directive in NGINX creates key-value mappings. In this case, it creates a mapping between the value of the variable
$ipinfo_countryand a new variable$allowed_country. - Variable mapping: The value of
$ipinfo_countryis used as a key to determine the corresponding value for$allowed_country. If the value of$ipinfo_countrymatches any of the specified keys, the corresponding value is assigned to$allowed_country. - Mapping values: The default key is used as a fallback value when there is no match for the value of
$ipinfo_country. In this example, if the value of$ipinfo_countrydoes not match any specified key, the value assigned to$allowed_countrywill be no. If the value of$ipinfo_countryis "SG" (Singapore), the value assigned to$allowed_countrywill be yes.
In the /etc/nginx/sites-available/ipinfotest file’s server section, we will add the following:
# Only grant access to IPs other than Singaporean IPs
if ($allowed_country = no) {
	return 403;
}
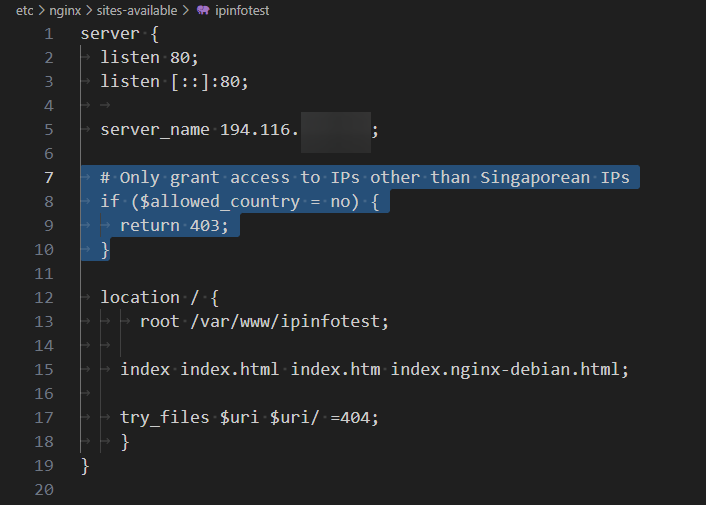
The return 403 line raises a 403 error when the web server comes across a Singapore IP address.
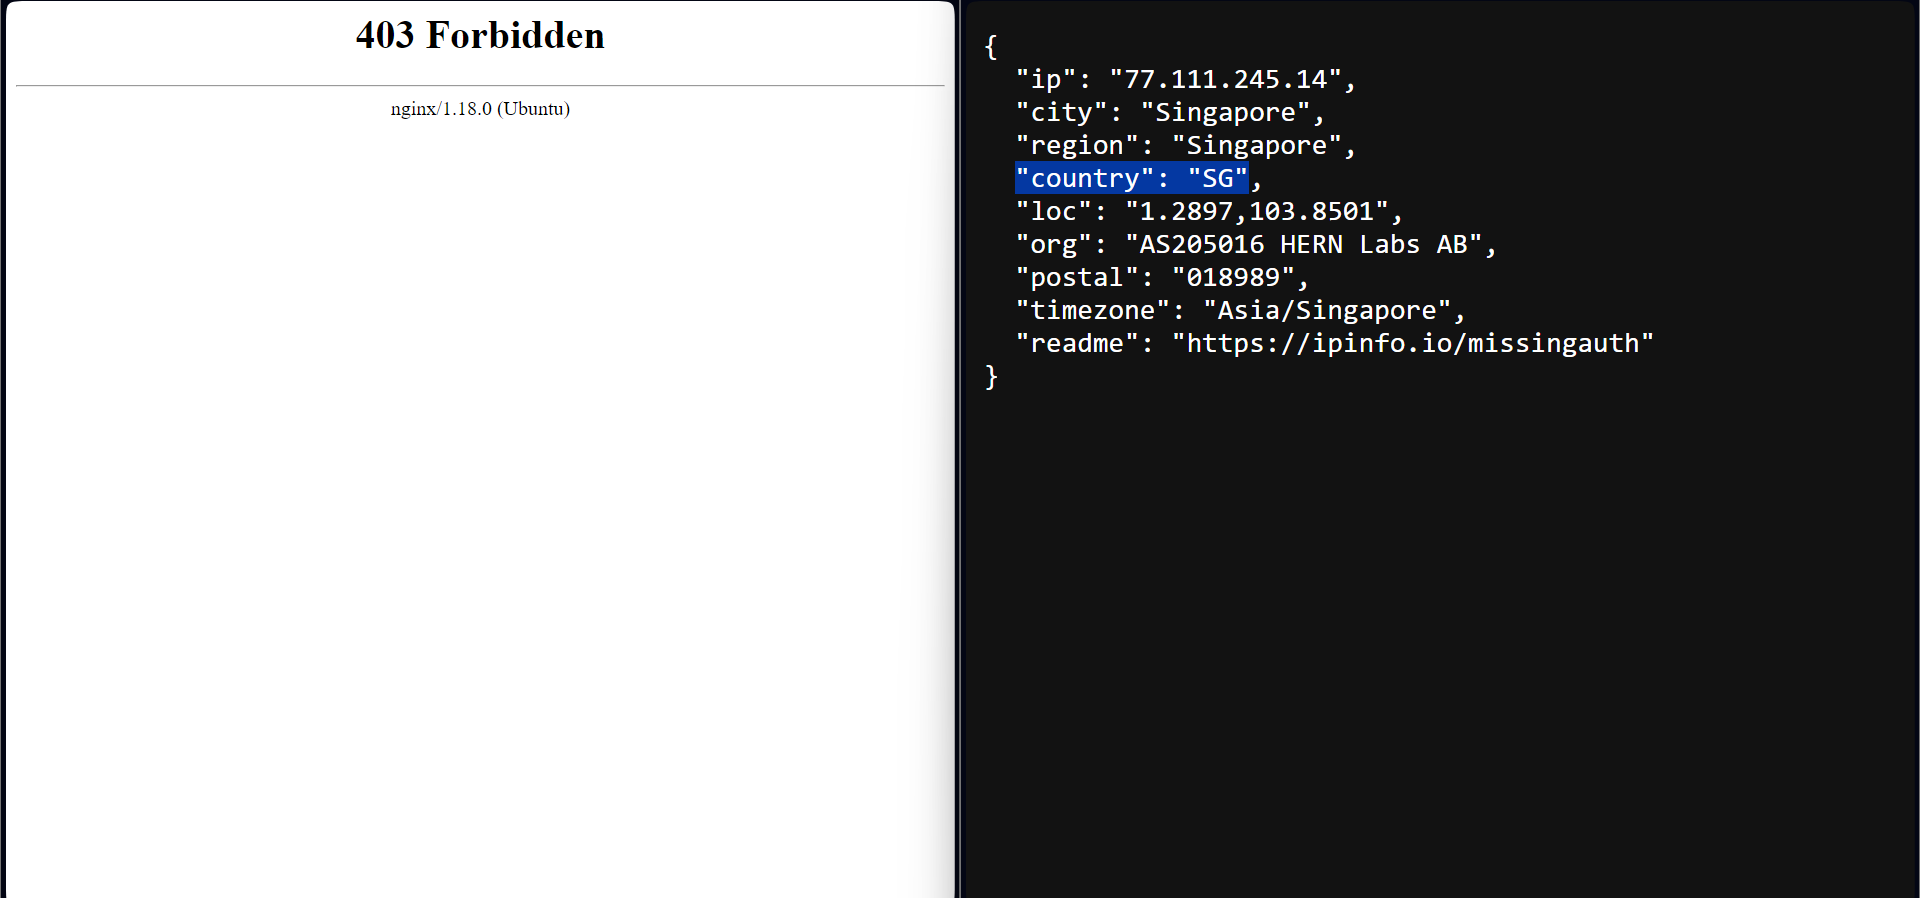
Now, we can test this configuration. I am using a VPN to relay traffic through Singapore. As we can see, we can not access the website and are getting hit with a 403 status error.
Using a non-Singapore IP address, we can access the website normally.
Allow only visitors from Singapore:
We can also reverse that and only allow visitors of a single country to access the site while denying access from all other countries. This is often seen on government websites, as some government's IT systems only allow connection within their country due to security policies.
For that use case, we just reverse what we did in the /etc/nginx/nginx.conf file and deny access to all visitors except users from Singapore.
map $ipinfo_country $allowed_country {
	default no;
	SG yes;
}
The /etc/nginx/sites-available/ipinfotest file will remain the same.
Deny access to multiple specific countries
You can even do access control over multiple countries. Just provide the two-letter country code in block letters and assign a yes or no to them. This is common in cybersecurity, compliance, and digital rights management. Sometimes, access to websites is not granted to IP addresses located in certain countries due to compliance reasons as well.
The below config (/etc/nginx/nginx.conf) denies access to IP addresses originating in Singapore, Iran, and Tanzania:
map $ipinfo_country $allowed_country {
	default yes;
	SG no;
	IR no;
	TZ no;
}
The file /etc/nginx/sites-available/ipinfotest will remain the same.
Deny access to an entire continent
Going one step beyond, you can even do access control based on the entire continent. But do remember that the European Union (EU), the international organization, is not the same as Europe (EU), the continent.
Modifying the config file (/etc/nginx/nginx.conf):
map $ipinfo_continent $allowed_continent {
	default yes;
	EU no; # Europe
}
The /etc/nginx/sites-available/ipinfotest file:
if ($allowed_continent = "no") {
	return 503;
}
Going even further, using our IP to Geolocation database, you should be able to extend these examples to do even more granular geolocation access control based on ZIP code and region/state. Give it a try!
Redirect users based on IP geolocation (country)
Aside from allowing and denying access to our website, we can also redirect users based on their IP geolocation. This is especially useful for eCommerce sites operating globally with local presence. For example, when it comes to Amazon, they will redirect Canadian website visitors to amazon.ca, British website visitors to amazon.co.uk and Indian website visitors to amazon.in even though all of these visitors across the world are visiting amazon.com
Building an eCommerce site from scratch is out of this tutorial's scope so that we will redirect users to an official government website within their country.
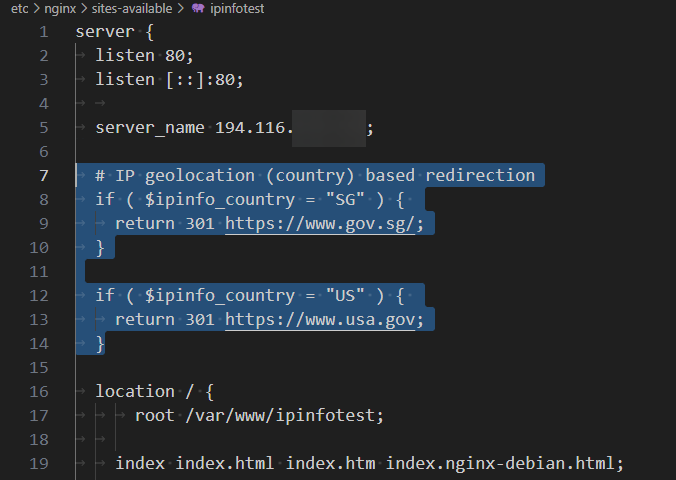
Add the following code to the server section in the website configuration file (/etc/nginx/sites-available/ipinfotest).
# IP geolocation (country) based redirection
if ( $ipinfo_country = "SG" ) {
	return 301 <https://www.gov.sg/>;
}

if ( $ipinfo_country = "US" ) {
	return 301 <https://www.usa.gov>;
}

This code looks up the IP address from IPinfo's IP to Country database and retrieves the $ipinfo_country variable, which contains the country information of the IP address in the 2-letter country code format.
If the IP address is from Singapore (SG), the user will be redirected to their government website (https://www.gov.sg/) while a 301 status error is raised. The same redirection occurs for American IP addresses to their government website when they visit our site. Visitors from other countries can see our website without any redirection.
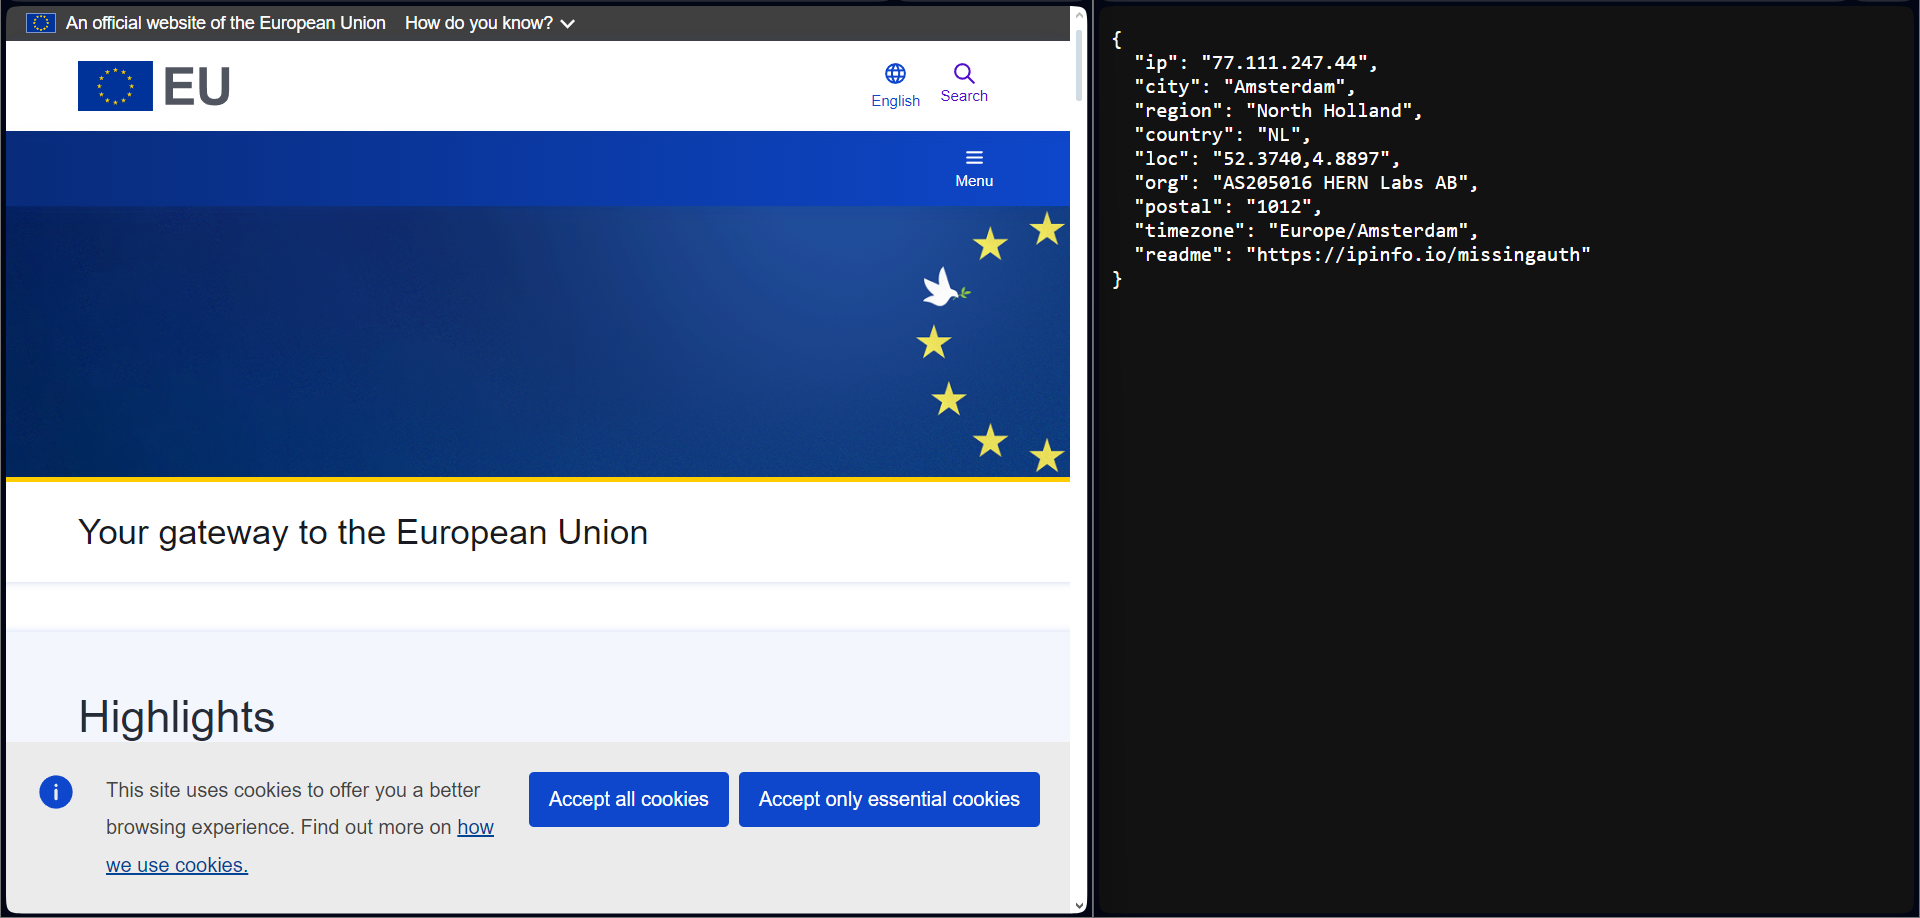
You can also use this redirection operation to cover multiple countries. In the code below, we showcase two ways to implement this. Users from European Union countries will be redirected to the EU's official website.
The first implementation uses regex to match the target country list. A map directive is used outside the server block in the second implementation. Then, within the server block, we refer to the map object value ($eu_country) to perform the redirection.
Option 1 (regex-based country code match)
The config website file: /etc/nginx/sites-available/ipinfotest
if ( $ipinfo_country ~* "(AT|BE|BG|HR|CY|CZ|DK|EE|FI|FR|DE|GR|HU|IE|IT|LV|LT|LU|MT|NL|PL|PT|RO|SK|SI|ES|SE)" ) {
		return 301 <https://european-union.europa.eu/index_en>;
	}
Option 2 (map + value match)
The config website file: /etc/nginx/sites-available/ipinfotest
map $ipinfo_country $eu_country {
		default no;
		AT      yes;
		BE      yes;
		BG      yes;
# [...]
		SK      yes;
		SI      yes;
		ES      yes;
		SE      yes;
}

server {
# [...]
	if ( $eu_country = "yes" ) {
		return 301 <https://european-union.europa.eu/index_en>;
	}
# [...]
}
Either way, the result is the same,
Load balancing with geolocation
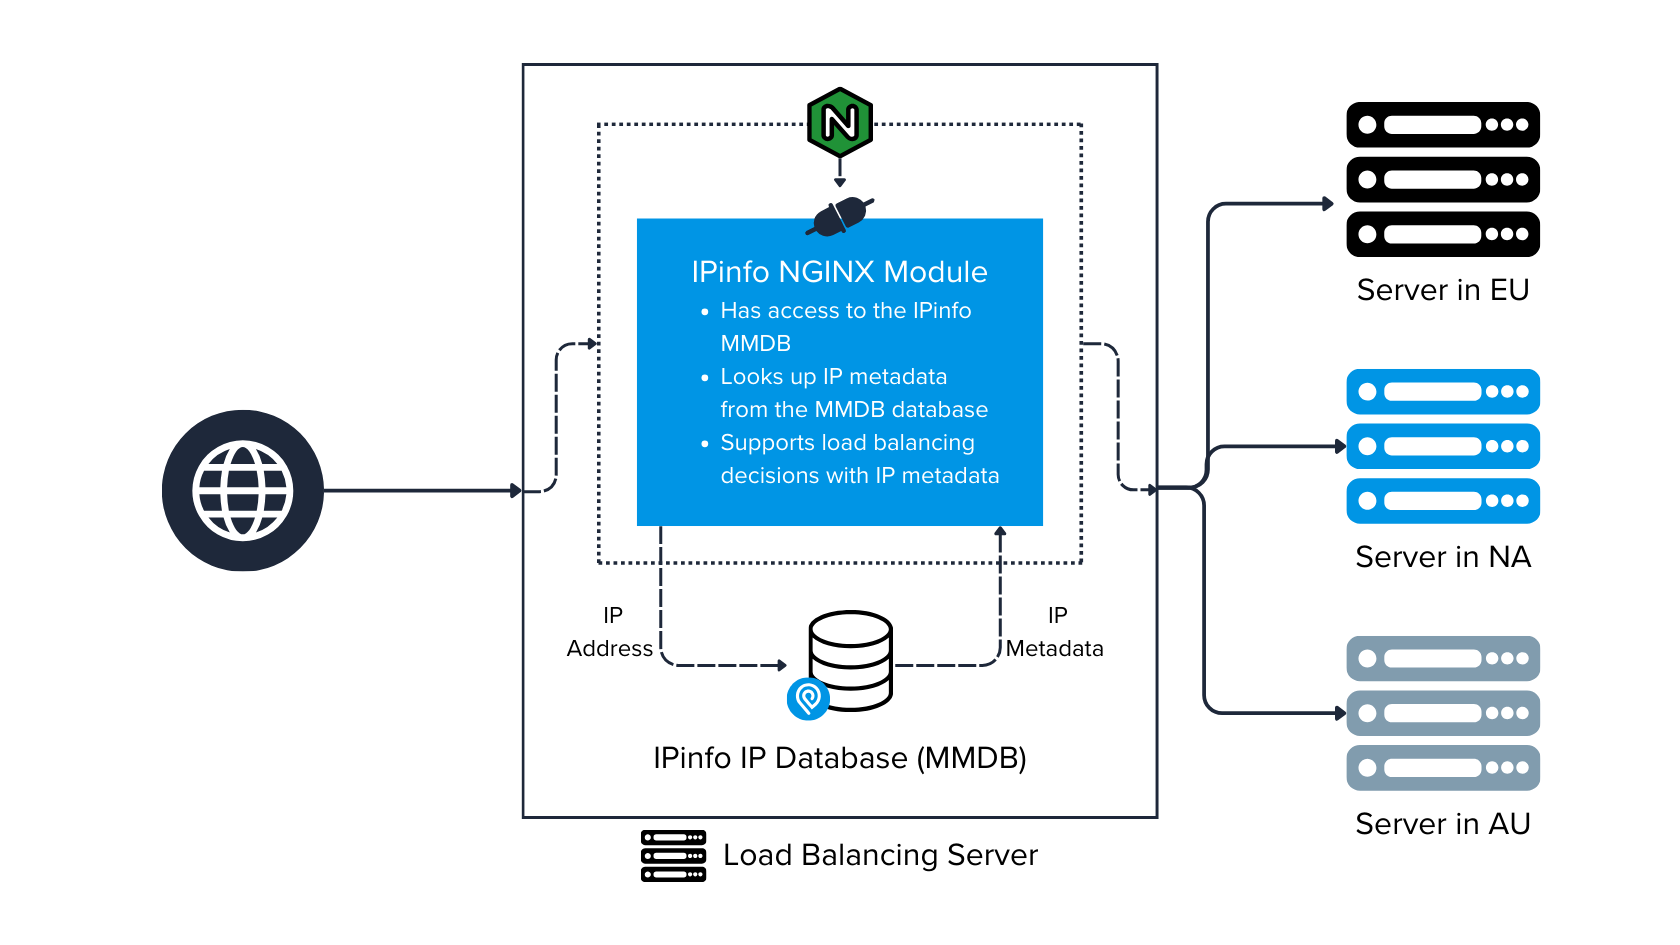
We now come to load balancing through IP geolocation. This is a common application of IP geolocation inside NGINX in an enterprise environment with multiple servers. Load balancing based on IP geolocation can significantly improve content delivery performance.
We will implement server-wide load balancing, adding the following code to the http block section of /etc/nginx/nginx.conf.
## Setting up upstreams for load balancing
map $ipinfo_continent $nearest_server {
	default all;
	NA      na;
}

upstream all {
	server example.com;
}

upstream na {
	server test.com;
}
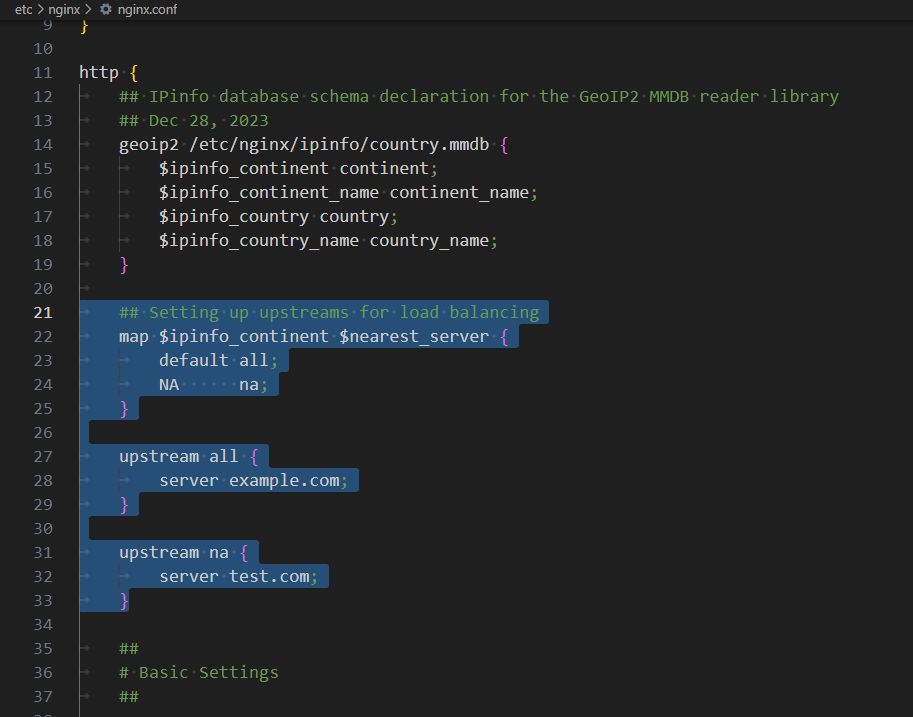
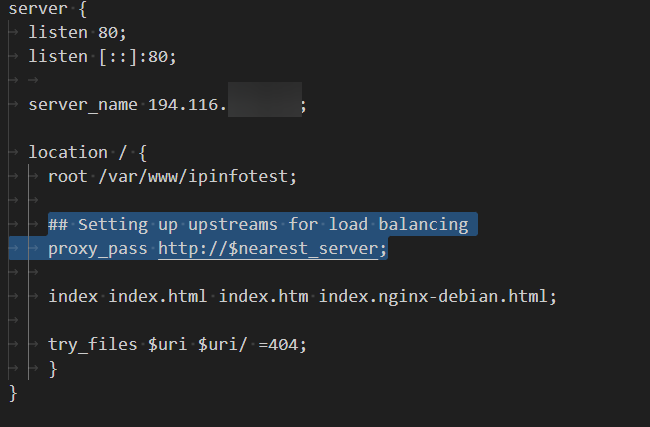
We will set up the proxy_pass directive in the website-level configuration file (/etc/nginx/sites-available/ipinfotest) to reverse-proxy the traffic.
## Setting up upstreams for load balancing
proxy_pass http://$nearest_server;
upstream represents a group of servers to which you can conditionally send traffic. Here, we are setting up the conditions based on the visitor's country. Although we are using dummy domain names, in practice, these will be IP addresses or domains, sometimes with port values.
The map directive checks whether the visitor belongs to North America (NA). If the visitor is based in North America, the web server will point to test.com to serve the user. If the visitor is not from North America (NA), they will be assigned a default key, and the associated domain will be example.com.
Restrict anonymous IP addresses
Going one step beyond IP geolocation-based configuration, we can explore access restrictions based on ASN, company, and, most popularly, anonymous IP detection. The anonymous IP address check can be done at the web server level before it reaches the backend framework. With the power of IPinfo and NGINX, we can implement robust access control for anonymous IP addresses, such as VPNs, proxies, bots, etc.
You must acquire the IPinfo IP to Privacy Detection Database to implement this. It is a premium database that identifies anonymous IPs, their type, and the anonymous IP service they are associated with. After you have acquired the dataset, follow the steps in the previous sections to set it up.
But essentially, add your token, and you can run the following commands to get started:
curl -L "<https://ipinfo.io/data/standard_privacy.mmdb?token=$token>" -o /etc/nginx/ipinfo/privacy.mmdb
echo '0 0 * * * curl -L "<https://ipinfo.io/data/standard_privacy.mmdb?token=$token>" -o /etc/nginx/ipinfo/privacy.mmdb' | crontab -
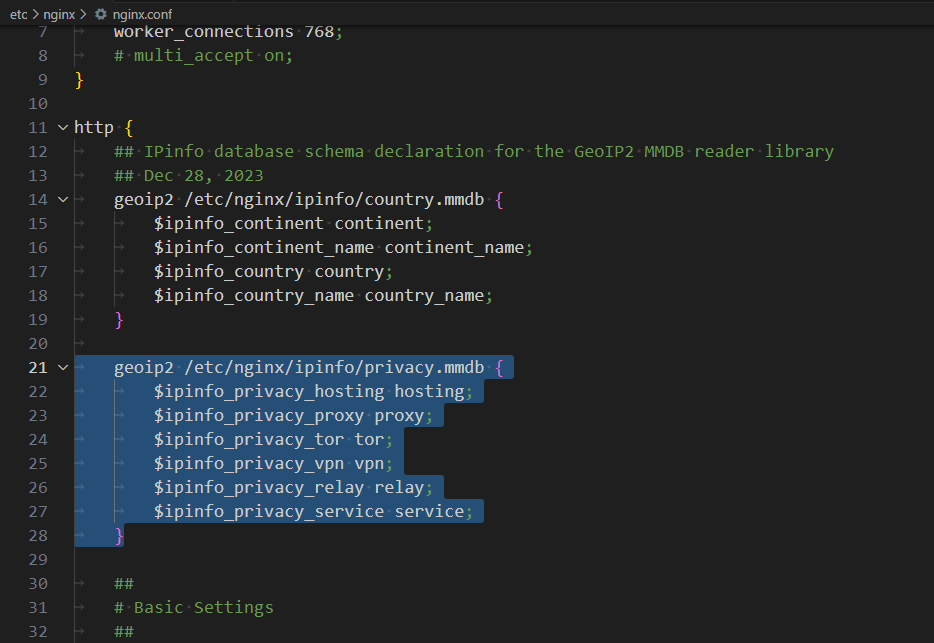
Then, you can set up the IP-to-Privacy Detection database in the NGINX main configuration file like this:
# [...]
http {
	# [...]
	## IPinfo database schema declaration for the GeoIP2 MMDB reader library
    geoip2 /etc/nginx/ipinfo/privacy.mmdb {
		$ipinfo_privacy_hosting hosting;
		$ipinfo_privacy_proxy proxy;
		$ipinfo_privacy_tor tor;
		$ipinfo_privacy_vpn vpn;
		$ipinfo_privacy_relay relay;
		$ipinfo_privacy_service service;
	}
	# [...]
}
# [...]
If an IP address is anonymous, the IP to Privacy Detection database will flag it with the value true in its corresponding anonymous IP type. The IP to Privacy Detection database identifies five types of anonymous IP services:
hosting(Hosting, server, data center, cloud provider IP, etc.)proxyvpntorrelay(Apple Private Relay, Akamai, Cloudflare, etc.)
{
  "ip": "103.76.21.138",
  "hosting": "",
  "proxy": "",
  "relay": "",
  "service": "",
  "tor": "",
  "vpn": "true"
}
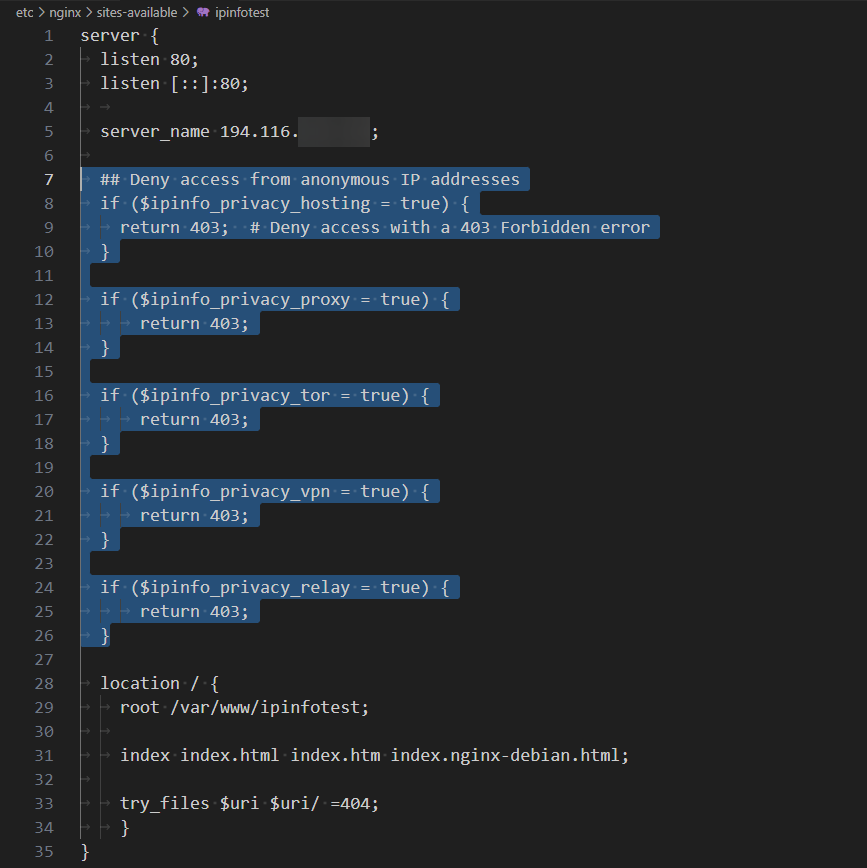
To accommodate for that in our website configuration file (/etc/nginx/sites-available/ipinfotest), we are going to perform checks for each type of IP address category. You can modify the section to your liking or create a map function. However, the core logic is essentially this:
## Deny access from anonymous IP addresses
if ($ipinfo_privacy_hosting = true) {
	return 403;  # Deny access with a 403 Forbidden error
}

if ($ipinfo_privacy_proxy = true) {
		return 403;
}

if ($ipinfo_privacy_tor = true) {
		return 403;
}

if ($ipinfo_privacy_vpn = true) {
		return 403;
}

if ($ipinfo_privacy_relay = true) {
		return 403;
}
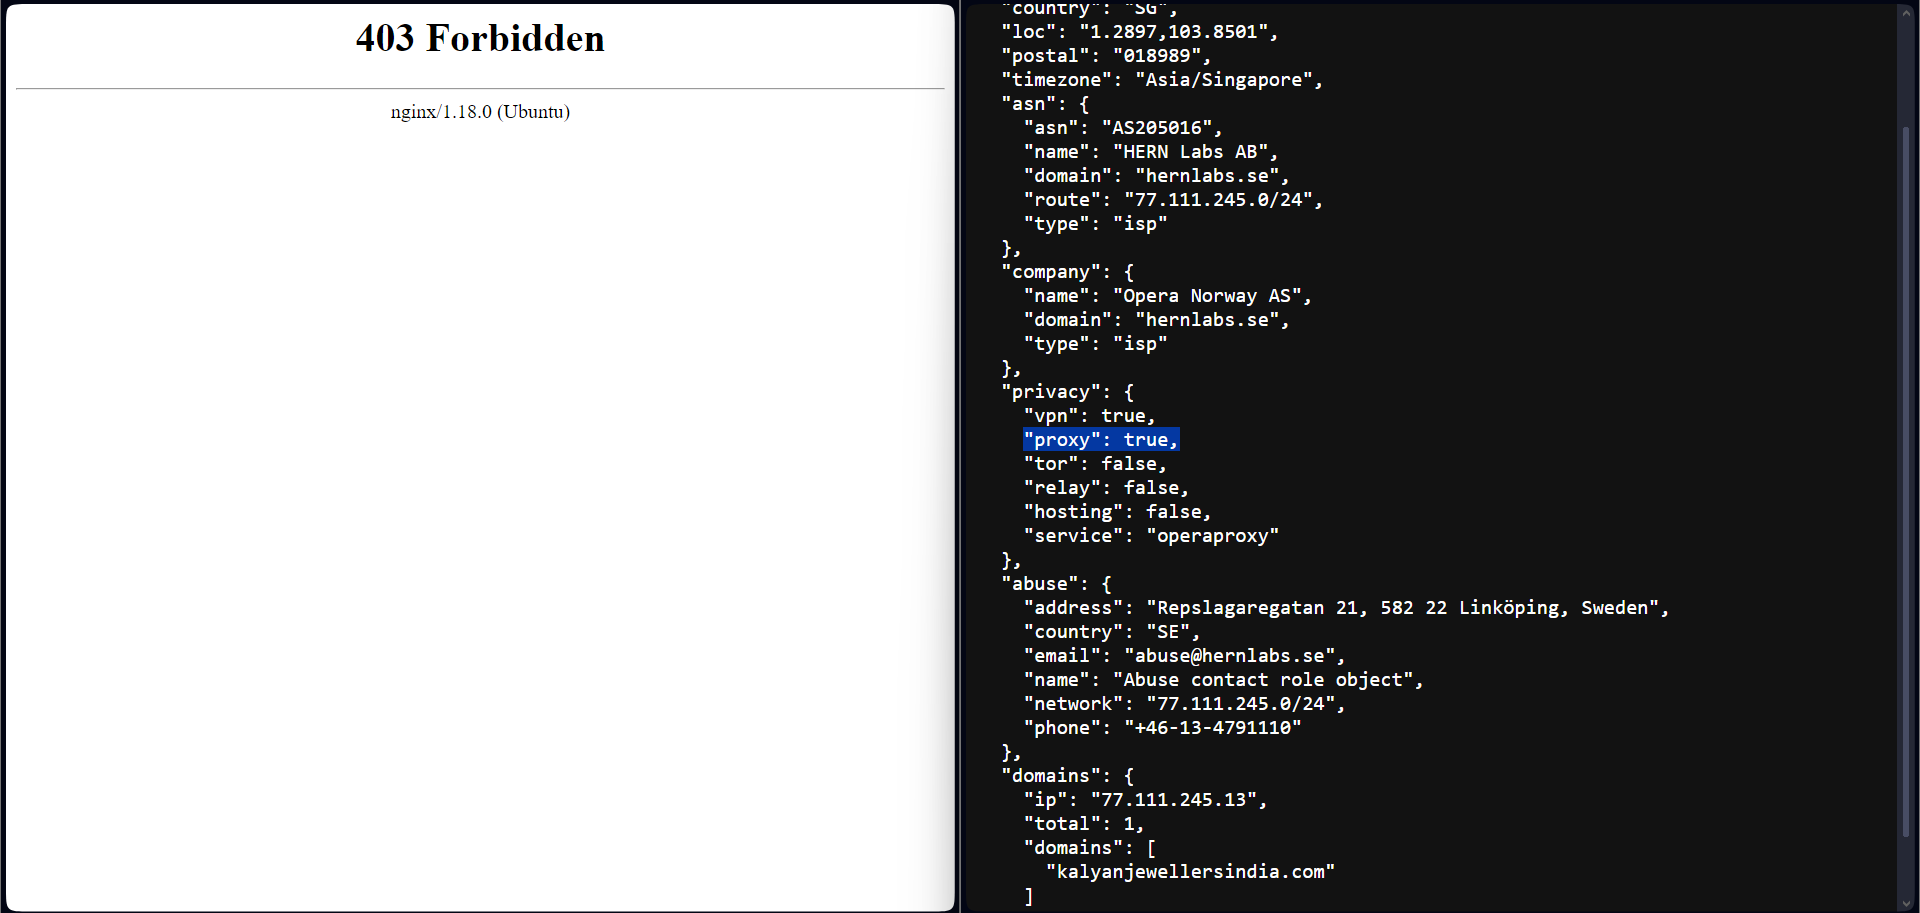
We can test this out by visiting our site from a VPN service. I am using Opera Browser's built-in VPN. As predicted, my IP address is getting flagged on the web server level, and I cannot access the site.
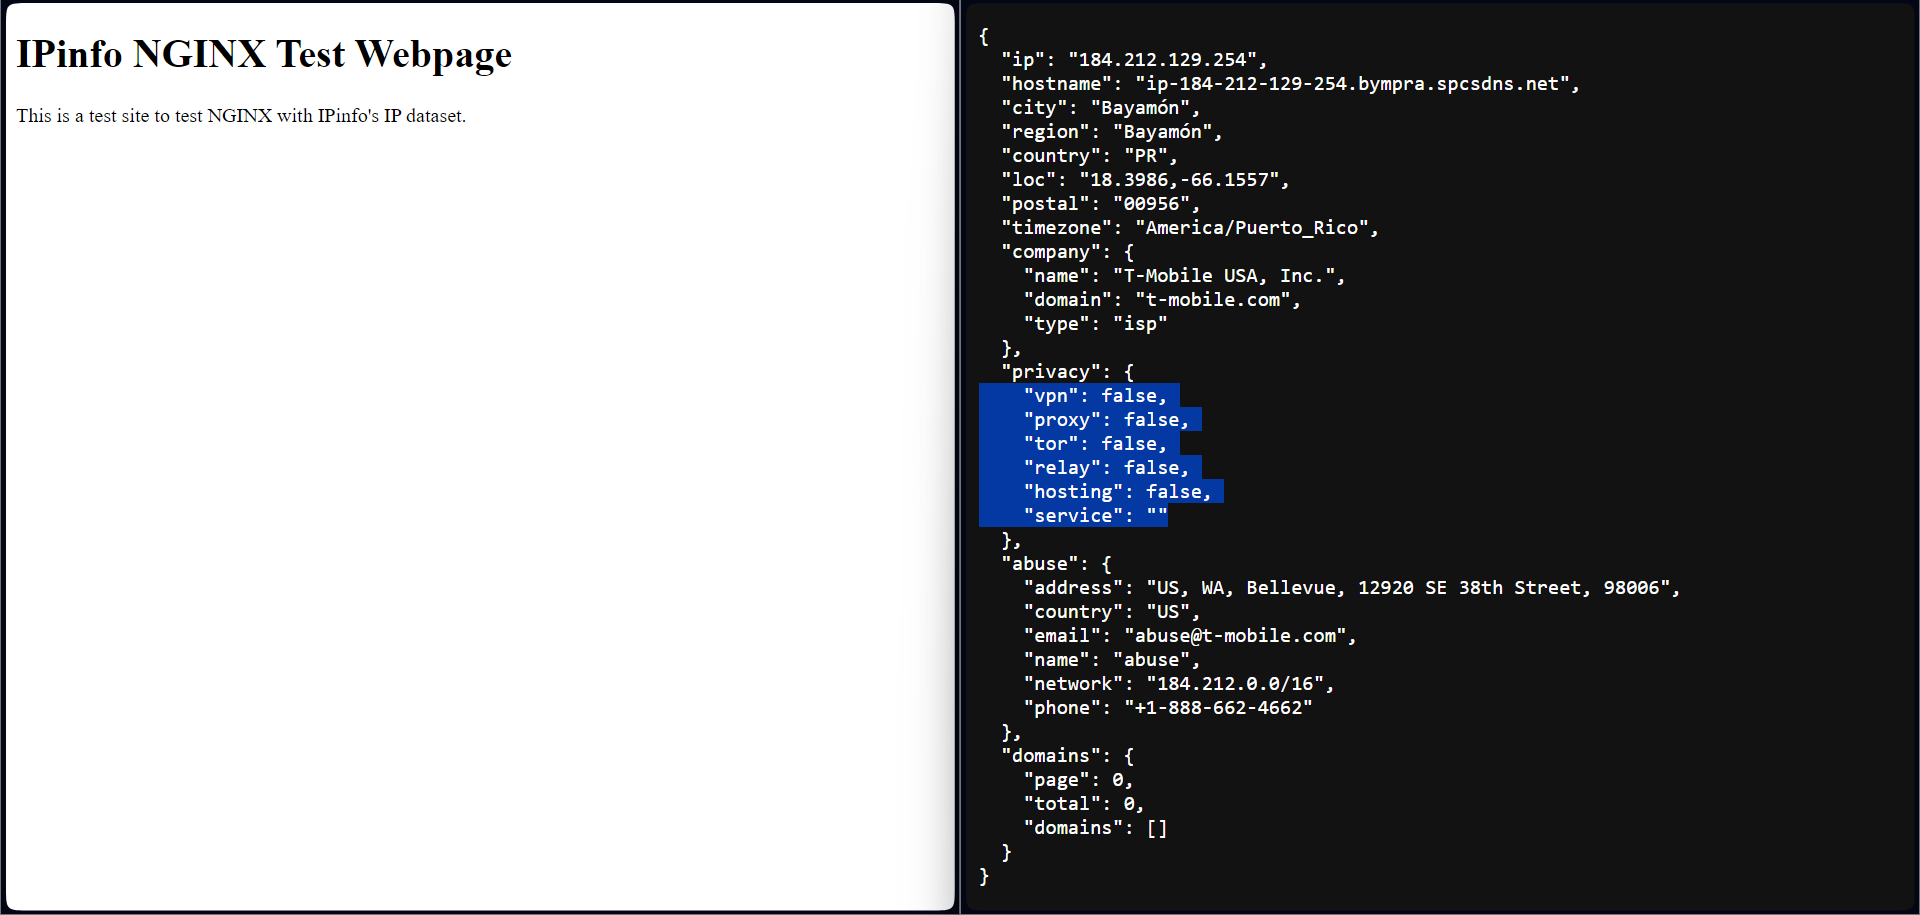
Turning off the VPN and trying again to see if we could access the site with a standard residential IP address.
Privacy detection at the web server is a robust security solution, as it does not consume computational resources if this detection is done on the backend infrastructure. Additionally, web server-level access restrictions can also mitigate distributed and large-scale attacks. For privacy detection, you should consider implementing an NGINX web server-level solution.
In this article, we set up NGINX and leveraged the power of IPinfo's IP database within NGINX configurations. We explored the integration of the GeoIP2 module to support IPinfo's IP database, enabling robust IP geolocation-based access control and redirection policies. Additionally, we implemented website access restriction policies using IPinfo's IP to privacy detection database, enhancing security and customization options.
By adopting these techniques, you can tailor your web server's behavior based on the geographical location and privacy characteristics of incoming requests. This not only improves user experience but also bolsters your website's security.
If you enjoyed this tutorial and want more information like this, the IPinfo community is full of tutorials, guides, and discussions among users on how to make creative and powerful use of IP intelligence data.