Users expect to have a personalized experience when they use your product. But with more users onboarded every day, with each one using your product differently, personalization needs to be more nuanced.
One way to create this nuanced personalization and cater to the needs of your growing list of users is with geo-targeting. This is where you send highly targeted content to your users based on their location. There are lots of ways to use geo-targeting in marketing. Popular methods include:
- Sending a text notification when potential customers are in the vicinity of a physical store
- Showing ads on social media based on audience location
- Showing testimonials on product pages based on where site visitors are located.
Another, more powerful method is location-based email marketing. Users are used to seeing emails that mention their preferences or highlight what they’ve done in the past. What they aren’t used to seeing is mention of their location. A subject line like “Everyone in Chicago can’t stop talking about our new product” holds so much more weight than “Check out what everyone is saying about our new product.” Calling out their location makes users sit up and pay attention to what you have to say — which is what helps with conversions.
But creating a successful geo-targeting email campaign involves more than setting up an API on your site and waiting for insights to roll in. You have to tailor specific content and send it to the right groups of users in order to learn more about them and make the most of your geographical data insights.
We’re taking a deep dive here to see how to use geo-targeting to improve email marketing campaigns and bring users more high-quality, personalized experiences.
Geo-targeting 101
Geo-targeting involves sending specific content to audiences based on their location. In some ways, a geo-targeted marketing campaign is similar to other types of personalized email marketing, where email segments and content are shaped by user behavior in and around your product. In a geo-targeting campaign, instead of sending emails based on data you collect when users use your products — like their preferences or where they spend the most time on your website — you send emails based on their location.
For example, say you’re about to launch a new project tracking app and don’t have a lot of user data yet. Geo-targeting helps you see how your product is used in different places:
- Users in New York are using the app to list their weekly tasks
- Users in the Midwestern areas are using it to track progress on a project
- Users in Los Angeles are using it to plan future projects
This gives you insights into what users from each location are looking for from your product and what their intended use cases are. For example:
- Users in New York might want to use your product as a weekly organizer tool and use it in a more personal setting.
- Users in Midwestern states might want to use your app as a project management tool.
- Users in Los Angeles might want to use your app like a vision board to get organized in a more creative setting.
These insights help you shape the future marketing materials that you send them and they help you learn more about different segments of your users.
Emails sent based on location should speak to these specific use patterns. As your user base grows, you can add in more data, like demographics, to get a better picture of who your users are. Geo-targeting acts as a stepping stone to get you there because once you know who your users are and how they use your product in different locations, you can share specific information. Going forward, you can anticipate how users in different locations will interact with your product and immediately share what’s most important to them.
To set up your email marketing campaigns with geo-targeting you need to set up tracking on your website, create targeted content, and then set up rules for when these emails will be sent. This helps you: differentiate how users use your product; cater to their needs; and get to know these users better over time.

Let’s take a closer look at how these parts work together.
Set up an IP lookup API
There are lots of ways to find out where your customers are located. You can ask during onboarding, with a survey or when users call the customer support team. While these methods are effective, they require users to take some kind of action.
Another option that allows for a seamless user experience is to add IP geolocation to your website. This way, every time someone visits your site you automatically see where they’re located. Take this a step further by matching email address and location when site visitors submit a form. For example, when users sign up for a newsletter match it to their city, region, and country.
Use our core API product to get users’ geolocations, ASNs, and hostname information. This will spit out fields like “ip” for their IP address and “city.”

The IP lookup API doesn’t give you user email addresses, though. You’ll have to ask users for this so that you can build a database that includes location fields and email addresses. What’s great about the API is that it updates your data automatically. So if a user moves, your database updates as well. Your database might look something like this:

Notice user first and last names are also included in this example. Since the IP lookup API doesn’t give you user names you’ll have to use a tool like Clearbit to get their names. This helps you add even more personalization to your email. We’ll talk about this a little more later on.
Create segmented email content
As your list of subscribers grows, the next step is to segment the list based on location and create content. This step is key since what matters to users in one location is different from another because of different experiences and expectations.
For example, geo-targeting tells you more than which languages users speak or the currency they use. It tells you about their culture, which is “one of the biggest influencing factors in a person’s preferences and personality.”
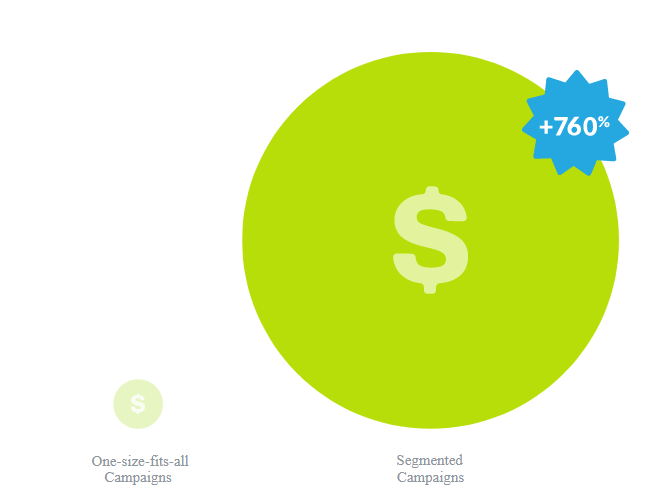
Studies show that “readers want to digest content that is most relevant to them and their interests.” Segmented campaigns have been shown to perform much better than a blanket approach to email marketing. The DMA found that segmentation results in a 760% boost to revenue.

To tailor your content to each segment, ask yourself a few questions:
- What do users from each segment say their needs are?
- Are there trends for where users in each segment spend the most time on your site?
- What kinds of questions do users from each segment submit to your help desk?
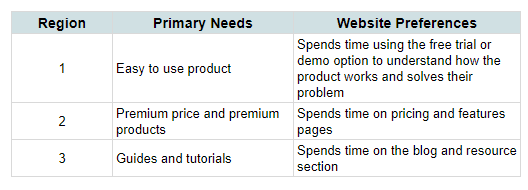
Use the answers you get from these questions to create a profile for the regions you track. For example, your profiles might look something like this:

Next, use this information to create personalized emails that speak to each of these concerns. For example, write an eBook tutorial for one region and send newsletters that promote premium products and access to another region.
Set up email delivery rules
Once you start to gather location data and have content that caters to different locations, your customized emails need a flexible email marketing platform to pull this all together.
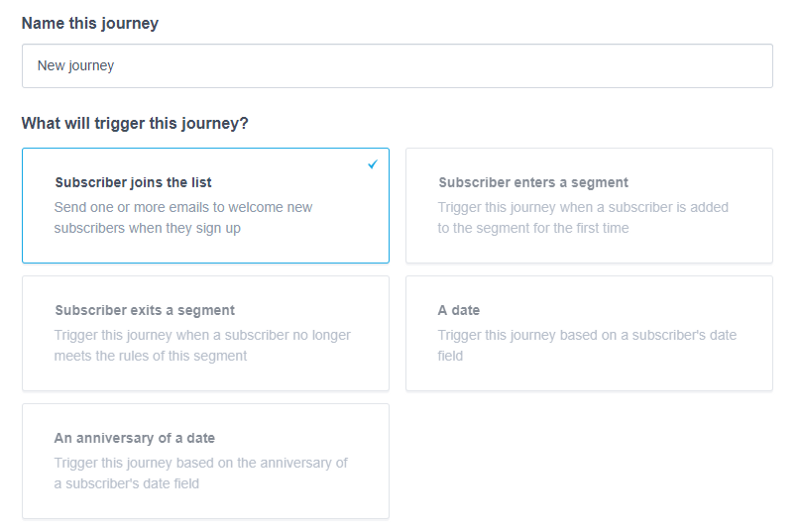
Choose from options like ConvertKit, Campaign Monitor or MailChimp to send automated emails based on location. For example, each platform lets you set up rules for when to send emails. The first step is to upload your segmented user lists and give each one a name so that you can create separate campaigns and customer journeys for each group.

First, decide what user actions will trigger the journey. In Campaign Monitor select “subscriber joins the list.”

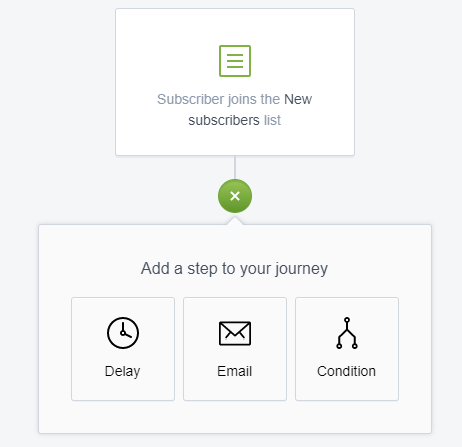
At the bottom of the page is where you specify which segment this journey is for. This is where your segmented lists come in. For example:
- US — easy use
- CA — premium products
- AU — guides and tutorials

Then decide what the first email in the series will be and when to send it. For example, the eBook email sequence should trigger when users join the US — guides and tutorials segment.

Once you’ve set up each of your customer journeys, track them in the Insights tab to see:
- How many emails have been sent
- How many emails have been opened
- How many links subscribers clicked on
Based on this information, make adjustments to your campaigns. For example, if clicks are low for the segments that want educational emails, dig to see if you’re providing the right kind of emails. Instead of text-heavy guides, embed video content to see if this makes a difference to clicks to your website. Include a short preview in the embedded video and a link to your website for the full video.
Next steps
Even though lots of people use your product, they use it differently because their needs are different. Location-based email marketing helps you communicate differently with each group to show that you understand their needs. This is more likely to lead to higher revenues and an improved user experience.
IPinfo is a comprehensive IP data and API provider with flexible pricing plans to meet your business needs. We handle billions of API requests per month, serving data like IP geolocation, IP to company, VPN detection, and more. Sign up for a free account or contact our data experts to learn more.
About the author

Internet Data Expert
